Accessing Outlook Emails with Exchange Web Services and OAuth 2.0 in C#
As organizations increasingly adopt cloud-based email services like Outlook (part of Office 365), developers need efficient ways to access emails programmatically. For automation, reporting, or building custom email clients, Exchange Web Services (EWS) provides a reliable way to access emails. In this guide, we’ll explore how to connect to Outlook via EWS using OAuth 2.0 authentication, the recommended approach for modern apps.
Why Use EWS with OAuth?
Exchange Web Services (EWS) offers extensive functionality that allows users to work with emails, calendars, contacts, and more. However, using basic authentication (username and password) with EWS has been deprecated due to security concerns. OAuth 2.0 provides a more secure method by leveraging access tokens instead of hard-coded credentials.
In this article, I’ll walk you through how to build a .NET app that connects to Outlook, retrieves emails, and processes them.
Prerequisites
A Microsoft 365 account with admin permissions to register the app.
Azure Active Directory app registered to obtain OAuth tokens.
Exchange Online mailbox to retrieve emails from.
Familiarity with C# and .NET development.
Let’s dive into the implementation!
Setting Up OAuth 2.0 with Azure
Before we begin coding, we need to set up an app in Azure Active Directory to enable OAuth authentication. Here’s a quick overview of the steps:
Register your app: Navigate to the Azure Portal → Azure Active Directory → App registrations → New registration. Enter a name, choose “Accounts in this organizational directory only,” and register.
Set permissions: Once registered, go to API Permissions and add the following:
Microsoft Graph API permission for
Mail.ReadorMail.ReadWrite.Exchange permissions like
EWS.AccessAsUser.All.Exchange permissions like
EWS.AccessAsUser.All.
3. Add client secret: In Certificates & Secrets, generate a new client secret. Make sure to copy it as it will be used in the code.
4. Tenant ID and App ID: You’ll need these values, which can be found in the Overview section of your registered app.
Step 1: Setting Up Constants
We start by setting up some constants to store our OAuth credentials and EWS URL.
public static readonly string OUTLOOK_SCOPES = "https://outlook.office365.com/.default";
public static readonly string OUTLOOK_APPID = "your-app-id";
public static readonly string OUTLOOK_SECRETID = "your-client-secret";
public static readonly string OUTLOOK_TENANTID = "your-tenant-id";
Step 2: Initializing the EWS Client
The main part of the program involves initializing an ExchangeService client using OAuth. This is done by acquiring an access token via the Microsoft.Identity.Client package.

In this code:
We use a
SearchFilterto filter emails based on when they were received. The filter retrieves emails from the inbox starting from a certain date.The
FindItemsResultsfetches up to 50 items at a time, and the emails are processed in a loop.
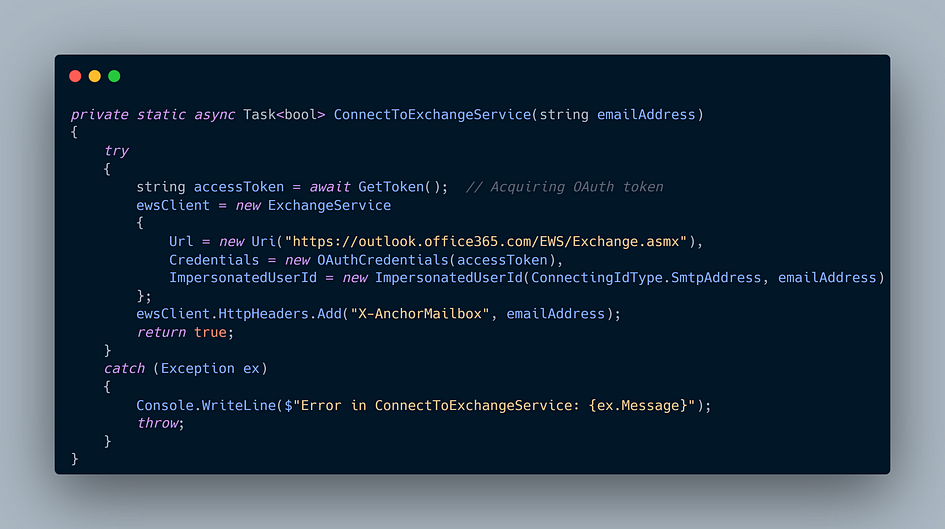
Step 3: Connecting to Exchange Service
Next, we implement the ConnectToExchangeService method. This method sets up the ExchangeService instance with OAuth credentials, making it ready to interact with Outlook.

We fetch the OAuth token using the
GetTokenmethod.ImpersonatedUserIdis used to specify the email address we're accessing.X-AnchorMailboxensures the request is routed correctly to the mailbox.
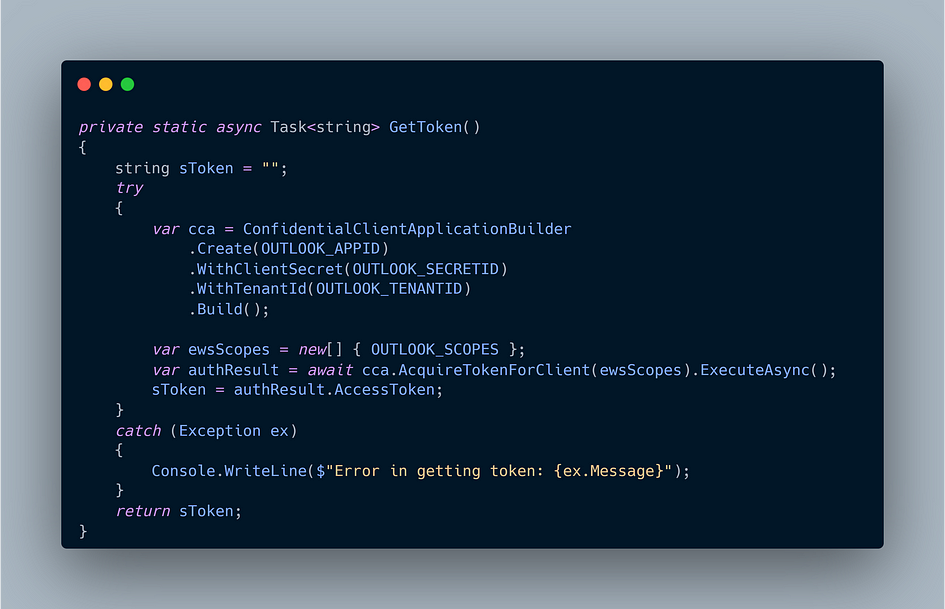
Step 4: Acquiring OAuth Token
Finally, we acquire the OAuth 2.0 token by interacting with the Azure app’s authentication system.

Conclusion:
In this article, we’ve covered the basics of accessing Outlook emails programmatically using Exchange Web Services and OAuth 2.0. This approach is modern and secure, allowing apps to interact with Office 365 services without directly handling user credentials.
You can extend this functionality further by adding support for email attachments, calendars, or even sending emails. Integrating OAuth with EWS ensures your app remains future-proof and secure.
Additional Resources:
